While rag quilts are indeed an honest-to-goodness type of quilt, they are so far simplified that they are super easy to make, even for those who are not into quilting. Also they are extremely fast – you could make a baby sized one from start to finish in a day if you wanted.


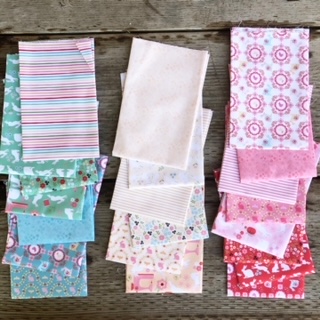
When I got the chance to sew with some of this adorable new fabric from Poppie Cotton, I wanted something quick and simple that would allow the sweet prints and colors to have center stage. A rag quilt was the perfect solution!


You can make it with pretty much any size of squares, or even some other basic shapes. Squares are the most common. Lots of folks use 5” squares so that they can use precut charm squares. I decided to cut mine 6” because that's the size of my favorite ruler, and cut 48 of them to make a baby size quilt.

For this style of quilt you also cut your backing at the same time. You can use an old sheet, flannel blanket, or of course quilting fabric. Just keep in mind that the backing fabric will show through to the front at least a little bit. I decided to make a random patchwork back out of the ivory colors in this fabric line. (It's called Poppie's Patchwork Club, if you want to track some down.)

Next cut your batting squares. They need to be 1” less than your fabric squares. Since my fabric squares were 6”, I cut my batting squares 5”. This is a very handy way to use up smaller pieces of batting!


Here is a handy visual.

Now you make your sandwiches. Place a backing square and a top square wrong sides together, with a batting square centered in the middle.


Next you quilt each sandwich. The most common method is to do an X shape from corner to corner, but you could try other shapes as well. Or if you feel fancy, free-motion a swirl or something in the center of each one. In any case, it's super fast and easy and cuts out the tedious basting step entirely.

I decided to do triple straight lines on mine. I used my regular foot with the pressure reduced a bit, and chain pieced all of them one line at a time. As you can see, the sandwich is reversible at this point.


No pressing or anything necessary! This method has so many short cuts, which is why it's so easy.

Now they are ready for the layout. You can go completely random and scrappy…

Or if you have enough of one color, alternate one color with the other colors for more of a gingham look.

I had the right amount to do a random diagonal layout, so that's what I went with. I also alternated the direction of the quilting lines for fun – and also so that it looks better if they don't line up.

It is always difficult to remember after many years of sewing that THIS time you have to sew WRONG sides together! The backing squares need to be on the inside, and when you open the seam, the seam has to be on the right side. Feels totally backwards! I always get mixed up and need a seam ripper at least once. 🙂
For these you need to sew a half inch seam allowance instead of the standard quilting quarter inch. If you catch a bit of batting in the seam, that's ok.

Once the rows are sewn, sew them together the same way – wrong sides together and the raw seam exposed on right side. You can nest the seams or sew them open – it doesn't matter.

To finish the outside edge, you can bind it like a regular quilt if you wish. But the easiest method, which is what I use here, is to finish it the same as the rest of the seams. Sew 1/2” around the outside of the quilt.

All done and ready for that finishing step!

Now with a pair of sharp scissors, make cuts all along each seam, at abut 1/2” apart. Make sure you do not slash through the stitching line!

This can be tedious, so I like to listen to or watch something, prop up my feet, and work on it. If my hand cramps from the scissors, I lay it aside to work on later. A large quilt will take a while, but a baby quilt isn't so bad.
When you are done, you will have each raw edge full of clips like this.


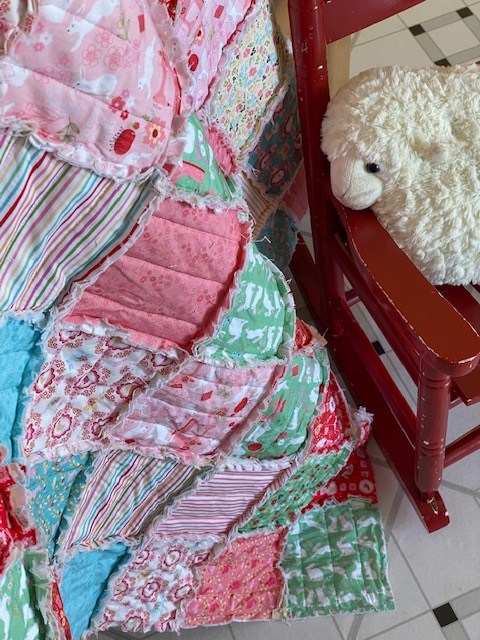
It's almost finished…but the final step is to throw it in the washing machine! This crinkles it a little and frays all those little cuts, which makes the perfect little fuzzy border around each square.

This type of quilt is extremely forgiving. If you have imperfect quilting or didn't match a square properly, or have uneven edges, no one will be able to tell. Plus it's extra sturdy and soft, which makes it perfect for babies and toddlers, when a regular patchwork quilt might not stand up to constant hard use and washing.


Plus it's basically reversible.


My finished size is 30 x 40” – I used a layout of 6 x 8 squares cut at 6” but sewn with 1” seam allowance to subtract, so finish at 5”. It's a great size for a small child to drag around in the car or stroller. I'm sure it will get lots of use…and I love seeing this adorable fabric around the house!


Leave a comment